|

|
|
||||
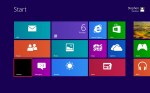
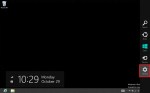
| Win Release Preview – tap Desktop. | Swipe right edge. | Tap Settings. | ||||
|

|
|
||||
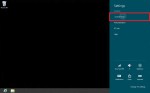
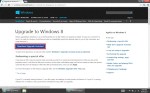
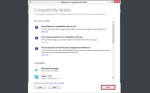
| Tap Control Panel. | Add Features to Windows 8. | Download Upgrade Assistant. | ||||

|
|
|
||||
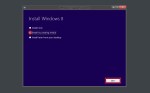
| Tap Next to review details. | Close window. | Create media. | ||||

|
|
|
||||
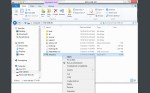
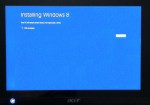
| Install to USB drive. | Open Setup.exe | Installing Windows 8. | ||||
Love it or not, the newest version of Microsoft’s flagship OS – Windows 8 represents an entirely new direction and focus for the software giant. Because of the tablet and touch screen interface revolution, Microsoft realises that it must adapt or die as many of it’s competitors in the industry have had to do over the decades. Redmond may not have the same mojo it had in the past, but it is still a formidable company with vast resources and knows that it must work hard to remain relevant in a world of shrinking PC sales. The new Windows 8 interface formerly known as Metro, is an acknowledgement by the company that the PC will not be “king of the mountain” forever.
Released gratis to the public by way of freely downloadable Consumer and Release Previews, these pre-release Windows 8 versions gave many IT professionals, developers, and enthusiasts the opportunity to become familiar with the new OS. Many chose to install these on PC hardware, and a smaller percentage chose to install on tablets running Windows 7. Being a tablet fanatic, I did both and installed on a run-of-the-mill desktop machine and on an Acer W500 Iconia Tab.
My key discovery was that Windows 8 requires a massive amount of free space to install. If you choose to upgrade your own Windows tab, I highly recommend you clean your drive as much as humanly possible before attempting the install. 15GB of free space is about the minimum amount of free space you can have and still install Win 8.
If you use Internet Explorer either on your Windows 7 or “upgraded” Windows 8 RC tablet, cleaning the temporary internet files helps greatly, as well as uninstalling unneeded apps, and moving the contents from your Documents folder to temporary storage. If you use Chrome as I did, removing the Google folder (found in C:\Users\YourUserName\AppData\Local), will mostly likely free massive amounts of space as it did on my tablet.
Upon clearing a minimum of 15GB of storage space on your tablet, ensure you have a blank USB stick with at least 3 GB of free space and follow the screenshots above to upgrade to Windows 8. NOTE: If you are attempting an upgrade from Windows 7 instead of Windows 8 Release Preview, use this link to download the Upgrade Assistant.
Part two of this series will cover the installation and steps performed immediately thereafter.


Leave a comment