
I used The Schwartz this morning, working on this IT Blogwatch article with Richi Jennings.
These are fun to work on, and I appreciate the opportunity to contribute to a great publication like ComputerWorld.
I used The Schwartz this morning, working on this IT Blogwatch article with Richi Jennings.
These are fun to work on, and I appreciate the opportunity to contribute to a great publication like ComputerWorld.
Posted in Announcement

I had tons of fun early this morning working on this IT Blogwatch article with Richi Jennings.
Posted in Announcement | Tags: Announcement, IT Blogwatch, NSA

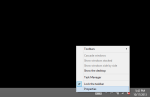
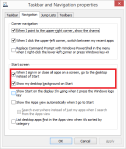
Many people have upgraded to Windows 8.1 for the sole purpose of being able to boot to desktop. Although it is very easy to change the settings to do this, Microsoft has placed these settings controls in the most non-intuitive place possible for users to find. The place that would have made sense would have been found in the [Control Panel][Administration Tools][System Configuration], [Boot] tab, instead it was buried under the Navigation and Taskbar properties on Desktop.
Follow these 3 simple steps to boot to desktop in Windows 8.1:
1) If on the home screen, click the Desktop tile.
2) In Desktop, right-click the Navigation bar at the bottom of the screen. (This is the bar that holds the clock tray). Select Properties in the context menu window.
3) Click the Navigation tab, and then tick the top two checkboxes in the Start screen section – most critical is the Show desktop background on start option.
Congratulations, you are now able to boot directly to Desktop.
Posted in Windows Tablet Tips, Windows Tablets | Tags: desktop, desktop tile, navigation bar, startup, Windows 8.1, Windows tablet, Windows tablet tips


Microsoft has decided to release Windows 8.1 today. If you have an existing Windows 8 installation, follow this link, and click the Get the update button which opens the Store app to start the free update, alternatively you can use tap the Store tile, then tap the Update link in the corner to accomplish the same task. For those of you new to Windows 8, you can purchase Windows 8.1 from Microsoft here. I recommend biting the bullet and purchasing the full Win 8.1 Pro edition.
If you are updating, you can pause or cancel during download, tap the progress tile, and these options appear at the bottom of the screen.
I will be checking out Win 8.1 today and trying to find hacks useful to users along with features/improvements to the OS. Enjoy!
Disclaimer: I am not associated or employed by any company producing software reviewed on this site.
Posted in Windows Tablet Tips, Windows Tablets | Tags: Windows 8, Windows tablet, Windows tablet tips

Google Reader – No Mas.
Today is the day we found out Google Reader will be no more. For those interested in finding a good app replacement to use on their iPad or Android tablet, I recommend Flipboard for the iPad, and the Pulse News reader for Android tablets.
Incidentally, the Pulse News reader is also available for Nook tablets, previously covered on Glasskeys.com here.
Disclaimer: I am not associated or employed by any company producing software reviewed on this site.
Posted in Android Tablet Applications, Android Tablets, iPad, iPad Applications | Tags: Android, apps, Flipboard, Google Reader, iPad, Nook, Pulse News, RSS

I recently ran across this video tutorial series called Building Apps for Both Windows 8 and Windows Phone 8 from Microsoft on the Channel 9 website.
Download links are available for each of the videos in the series, in both WMV and MP4 formats which means you could watch the tutorial on your iPad if you so desire.
Posted in Windows Tablet Tips, Windows Tablets | Tags: programming, Windows 8, Windows 8 tablets, Windows Phone

|

|

|
||||
| Settings. | Control Panel. | Power Options. | ||||

|

|

|
||||
| Tap the “Choose when to turn off display” link. | Change advanced power settings. | Display – “adaptive brightness” settings. | ||||

|
||||||
| Click Apply and close setting windows. | ||||||
Although the Windows 8 platform is a great platform for tablet and touch screen devices, there remain some areas that Microsoft could improve upon. One of these areas is the feature known as Adaptive Brightness. The intended goal of adaptive brightness is to automatically adjust screen brightness settings to match ambient light levels. In plain English this means: “If it is bright outside, make the screen brighter. If in a dark room, dim the screen a bit.”
Sounds good…in theory. In reality, this “feature” is as adaptive as the extinct dodo or sabre-tooth tiger. Dimming the screen at random intervals (usually whilst watching video or engaged in productive pursuits), makes this Windows 8 feature as welcome as Clippy was to users of Office ’97.
The least frustrating solution I have found to fix adaptive brightness, is to turn it off entirely.
To do this on your Windows 8 tablet, navigate to Control Panel, then Power Options. Tap the “Choose when to turn off display” link, then the “Change advanced power settings” link. In the Power Options window, scroll down and expand the Display section – buried inside this is the Enable adaptive brightness setting group. For each option in this group, select the off value in each drop-down.
Posted in Windows Tablet Tips, Windows Tablets | Tags: adaptive brightness, screen dimming, Windows tablet, Windows tablet tips


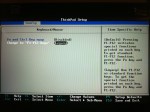
Recently I purchased the Lenovo S230u “Ultrabook” which is a Windows 8 laptop/tablet device. The screen can swivel and fold over, literally transforming itself into a Surface tablet. In my case make that Surface Pro – as I replaced the EOM “tweaked” version of Windows 8 with a fresh 64 bit install of Windows 8 Pro.
Whilst gleefully using my device I discovered that I really didn’t want have to press the red Fn key every bloody time I need to use one of the function keys (F1-F12), which is the default out-of-the-box behaviour.
Messing about in the Thinkpad Setup (BIOS) menu, I discovered the answer to the problem. Oddly enough the hardest problem I encountered was figuring out how to access this menu in the first place. It turns out shutting down the machine and turning it back on will not present an opportunity, the only reliable way I found after reboot to see the “To interrupt normal startup, press Enter” caption was to restart.
After you click restart, and the machine starts to reboot, keep your finger poised over the Enter key, because you will only have a window of 1 or 2 seconds before the caption disappears. Once the Thinkpad Setup menu appears, navigate to the Config menu and set the Change to “F1-F12 keys” value to Legacy.
Finally because the setting doesn’t take effect until after you save you will need to press Fn F10 one last time to save and exit.
Happy keyboarding!
Posted in Windows Tablet Tips, Windows Tablets | Tags: function keys, Thinkpad S230u, Windows tablet, Windows tablet tips
Microsoft Press Blog
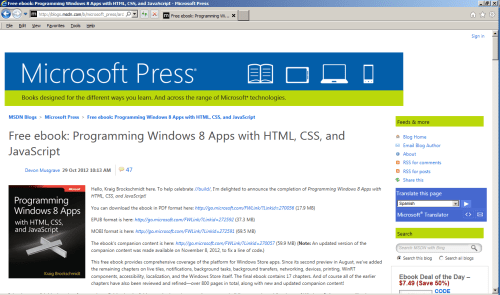
For those interested in developing apps for Surface Pro tabs or Windows 8, you may be interested in a free eBook from Microsoft Press on the topic.
Click here to open the Programming Windows 8 Apps with HTML, CSS, and JavaScript book page with downloads available in PDF, EPUB, or MOBI formats.
Disclaimer: I am not associated or employed by any company producing software or books reviewed on this site.
Posted in Windows Tablet Applications, Windows Tablets | Tags: apps, programming, Windows 8


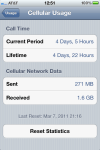
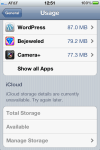

Whilst using my iPhone recently, I discovered a display bug that occurs only when the Cellular Data option has been turned off under Network Settings in the Settings application. The minor display error can be reliably duplicated by navigating to General, Usage, then rapidly opening the Cellular Usage menu before the Storage section has time to display application storage data.
Upon returning to the Usage screen and waiting until the application storage data loads, scrolling causes the iCloud storage section text to duplicate and the Battery Usage caption to merge inside of the disabled iCloud Manage Storage text.
Although I have disabled all of the cell data options from my iPads (due to the greedy data plan fees of AT&T), I am curious if any iPad users out there who still use cell data can duplicate these steps to determine if this is an issue on the iPad. With both cell data and Wi-Fi turned off it won’t cost a pence.
Posted in iPhone, iPhone Tips | Tags: Bug, iOS, iOS 5, iPhone, iPhone Tips
 Deutsch
 Français
 Español
